Flight Ability Test
Test the flight ability of different seeds and create our own models of winged seeds. This activity complements the activity described in the “Clever cones” biomimicry story.
Age Group: 9-12 years
Duration: 15-30 minutes
Biomimicry Connection:
Nature uses many different adaptations to create lift and fly. Seeds adapt their form to deliver the function they wish to deliver. By observing how seeds acheive this, we can learn to improve the efficiency of human designs.
Activity Details:
Tools and Materials
- Seeds from as many trees as possible (e.g. maple, spruce, pine, fir, ash, alm, birch, aspen, linden, beech, oak, rowan etc.)
- Sheets of paper, pea seeds, quick-drying adhesive, scissors and pencils, measuring tape
Preparation
- It is best to carry out this activity somewhere outside in a place from where you will be able to drop seeds from at least a few meters height (e.g. from a bridge, terrace, etc.). Since we mainly want to demonstrate the ability of (winged) seeds to get as far as possible, it is advisable to choose a day with a steady wind for this activity.
- Eventually, this can also be done indoors - either directly in the classroom, where it is good to prepare e.g. some steps to the ceiling or near the school staircase. In this case, windy weather can be simulated by turning on a floor fan.
Description
- Show pupils the tree seeds you have prepared. You can have them guess what trees they are from.
- For each type of seed, ask pupils to estimate how far it can fly. They should think about the wind strength and the height from which the seed is released.
- Give each pupil a seed(s) and gradually have them drop the seed from the raised spot.
- Using a measuring tape, measure the distance the seed has flown. Ask one pupil to write down the distances flown by individual seeds in a table (on the board).
- Evaluate how individual types of seeds flew (how far or how long they stayed in the air if there is no wind) and also discuss how trees that have non-flying seeds (e.g. acorn, beech, cherry, etc.) spread (by animals - ask pupils if they know any interesting examples).
- Continue the discussion: Why do you think the dry seeds flew better that the wet seed? How does this relate to the strategy pine cones have of opening in dry weather and closing in wet weather? Why do they do that?
Extension
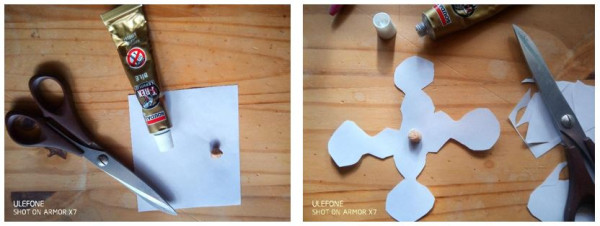
- After (or before) the experiment above, you can ask pupils to each make a model of a flying seed (shape according to themselves) in order to test how well it flies. It is also possible to prepare several patterns (about 5) of aileron shapes in advance and let each student choose and make the one they think will fly best.
- To make wings, use paper on which stick a dried pea.
- Don't make the wings too big, so only give each pupil a small piece of paper. Encourage pupils to try and come up with different shapes for the aileron (see image below). Also, make some imitations of real winged seed as well.
- Finally, test and compare how each model flies - using distance flown just like the activity with real seeds.